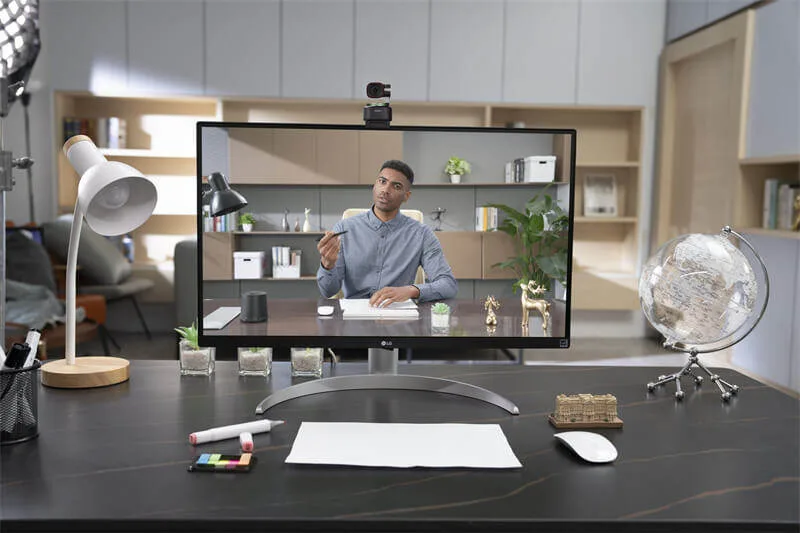
If you've ever wanted to grab a quick photo without reaching for your phone, learning how to take a picture with the webcam is one of the simplest tricks in the book. Most laptops today ship with a built-in camera, and a decent external webcam usually tops out at 1080p resolution, so you've already got the hardware. The trick is knowing which app to open, where the file lands, and what to do when your computer won't see the camera.
In our research across operating system documentation and manufacturer support pages, the workflow is consistent in 2026: open your OS-native camera app, grant camera permission if prompted, frame your shot, and click the shutter. Windows, macOS, and Linux all bundle this capability out of the box, so there's nothing extra to buy. Below, we'll walk through each platform, fix the snags that come up most, and show you when a third-party tool actually helps.
Quick Answer
Open your computer's built-in camera app: the Windows Camera app on Windows 10 or 11, Photo Booth on macOS, or Cheese on most Linux desktops. Grant camera permission if your system asks. Frame yourself in good light.
Click the shutter button. Find the saved photo in your Pictures folder. For external USB webcams, plug it in first and repeat.
Why Your Webcam Setup Matters Before You Snap a Photo
Before you start clicking buttons, it's worth taking 30 seconds to think about your setup. The two biggest factors that decide whether your webcam photo looks good or grainy are lighting and resolution. Aggregate reviews of webcam photos on social platforms consistently flag bad lighting as the top complaint, ahead of focus issues or color accuracy.
Manufacturer specifications for typical integrated laptop webcams in 2026 land at 720p (1280×720) as the baseline, with premium ultrabooks stepping up to 1080p (1920×1080). External USB webcams from brands like Logitech commonly hit 1080p or 4K, but the spec only matters if your software actually captures at that resolution.
Here's the practical bit: if you're shooting a profile pic for LinkedIn or a quick avatar for Slack, 720p is plenty. If you need a high-res headshot for a portfolio, an external 1080p webcam will look noticeably sharper than the built-in camera on most laptops. Match the tool to the job, and you'll save yourself a retake.
Built-In Webcam vs. External USB Webcam: Which One Are You Using?
This is the first real decision branch, and it shapes everything else. The path you take in the next sections depends on which camera you're actually planning to use.
| Feature | Built-In Webcam | External USB Webcam |
|---|---|---|
| Typical resolution | 720p or 1080p | 1080p or 4K |
| Connection | Hardwired inside the laptop | USB-A or USB-C cable |
| Portability | Always with you | Must be carried separately |
| Image quality | Decent for casual use | Noticeably better in low light |
| Driver setup | Preinstalled by OS | May need driver install on older systems |
| Best for | Quick profile pics, video calls | Higher-quality headshots, streaming |
If you're using a desktop monitor with no camera, or you've plugged in a webcam to upgrade your setup, follow the external path. If you're on a laptop and haven't connected anything, you're on the built-in path. The good news: the software steps are nearly identical once your OS recognizes the camera.
How to Take a Picture with the Webcam on Windows
Windows ships with the Camera app, which Microsoft has bundled into Windows 10 and 11. It's the fastest route and works with both built-in and external webcams.
Using the Windows Camera App
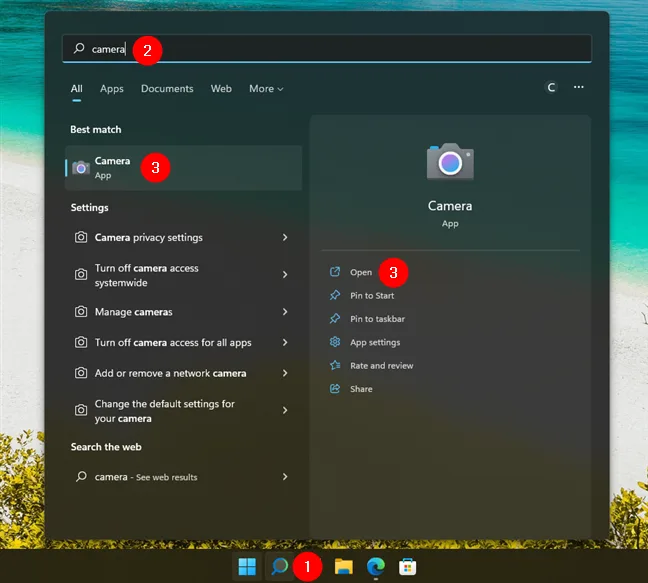
If Windows Camera isn't already on your taskbar, type "Camera" into the Start menu search bar and click the app result.
Once it's open, you should see a live preview from your webcam. If you see a blank screen or an error, skip ahead to the troubleshooting section below, that's a permissions or driver issue, not a workflow mistake.
Look for the camera icon button on the right side of the screen. That's your shutter. Click it once to capture a still photo.
The app saves your image automatically, no save dialog, no filename to type. By default, your photo lands in This PC > Pictures > Camera Roll.
Here's the catch most people miss: if you have multiple cameras connected (say, a built-in camera and an external USB webcam), Windows Camera might pick the wrong one. Click the camera-switch icon at the top right of the window to flip between them, then take your shot.
Granting Camera Permissions in Windows
Windows 10 and 11 require apps to ask permission before they can use your camera. If your shutter button does nothing, this is almost always why.
Go to Settings > Privacy > Camera. Make sure "Let apps access your camera" is toggled On. Scroll down and confirm the Camera app specifically has permission.
If you've turned this off in the past to block Zoom or Teams from auto-starting, you've also blocked the Camera app. Flip it back on, restart the Camera app, and try again.
Microsoft's official documentation on Windows Camera permissions walks through the same toggle if you want a second opinion.
Updating the Webcam Driver Through Device Manager
When the Camera app doesn't see your webcam at all, the driver is the next place to look. Right-click the Start button and open Device Manager. Expand the "Cameras" or "Imaging devices" section.
If you see your webcam with a yellow triangle, that's a driver problem. Right-click it, choose "Update driver," and pick "Search automatically for drivers." Windows will pull the latest version from Windows Update in most cases.
If the camera doesn't appear in Device Manager at all, unplug your external webcam and plug it back in, then check again. Built-in cameras that vanish usually point to a Windows Update that broke things, and a system restart often brings them back.
How to Take a Picture with the Webcam on macOS
Apple gives Mac users two built-in options, and picking the right one depends on whether you want a quick snapshot or a higher-resolution file.
Using Photo Booth (Quick and Simple)
Photo Booth is the friendly, simple option. It's been on every Mac since 2005 and it works exactly the way you'd expect: open the app, see yourself, click the shutter.
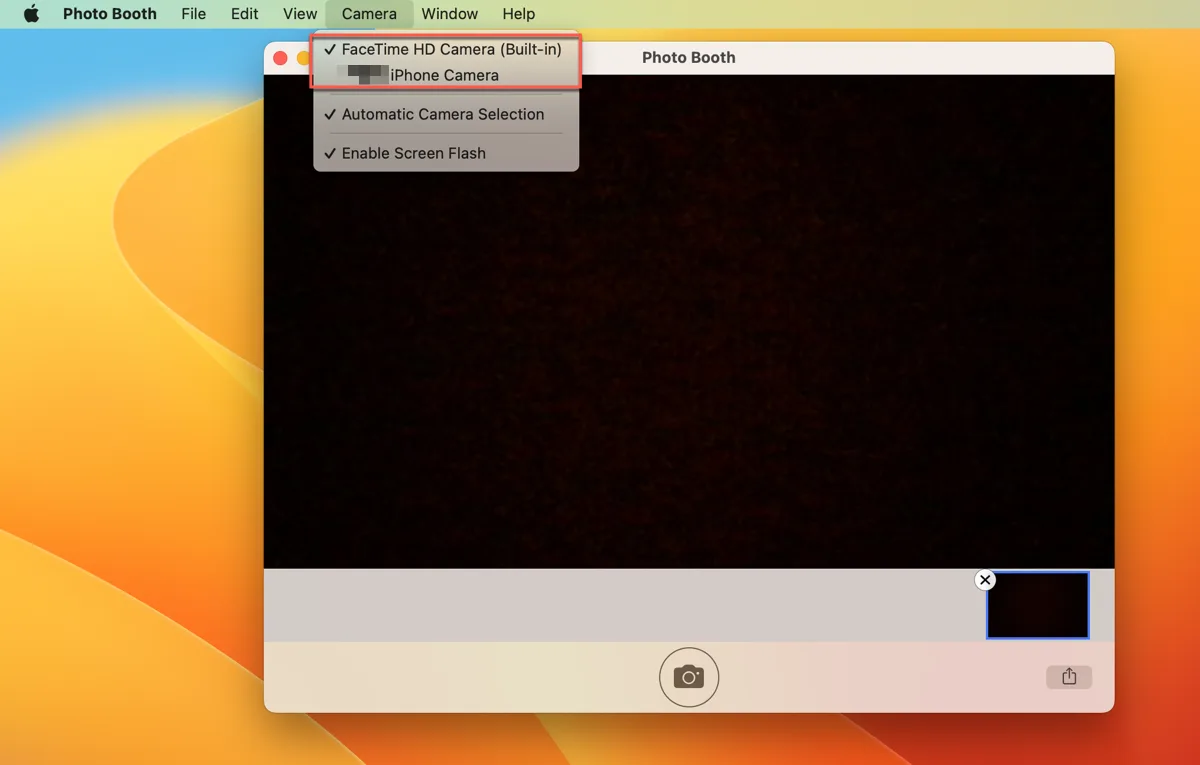
Open Photo Booth from your Applications folder or Spotlight. You'll see a live feed from your webcam. The red shutter button at the bottom of the window captures a single still photo.
The image appears as a thumbnail in the strip along the bottom of the window.
To save the photo, select the thumbnail, then drag it to your Desktop, right-click and choose "Export," or use File > Export. Photo Booth defaults to saving images at roughly 1512×2016 pixels on modern Macs, which is more than enough for social media.
The trade-off: Photo Booth doesn't give you much else. No timer, no burst mode, no resolution settings. It's a one-button tool, and that's the point.
Using Image Capture for Higher-Resolution Shots
If you want a clean, no-frills capture at the webcam's native resolution, Image Capture is the better pick. It's a utility most Mac users have never opened, but it's been bundled with macOS for years.
Open Image Capture from Applications. Your webcam shows up in the Devices sidebar. Click it, and you'll see a live preview on the right.
Hit the shutter button at the bottom to capture a still.
Image Capture gives you a slight edge in resolution control. Where Photo Booth saves at a fixed size, Image Capture typically saves at the camera's full sensor resolution, which can mean sharper detail in your final file. The catch is that there's no on-screen preview thumbnail, the photo just appears in your chosen save folder.
Enabling Camera Access in macOS Privacy Settings
If your Mac shows a black screen in both Photo Booth and Image Capture, the camera permission is probably off. Apple tightened these settings starting with macOS Mojave, and any app that wants the camera now needs explicit approval.
Open System Settings > Privacy & Security > Camera. You'll see a list of apps that have requested camera access. Make sure Photo Booth and Image Capture both have their toggles turned on.
If they're not on the list, open the app once, close it, and check back, macOS adds the app to the list the first time it tries to use the camera.
This is also a useful place to audit which apps currently have camera access. If you see something unfamiliar, toggle it off. Apple's official privacy documentation covers the same controls if you want the full breakdown.
How to Take a Picture with the Webcam on Linux
Linux doesn't have a single default camera app across every distribution, but the two most common paths cover the vast majority of desktops in 2026.
Using Cheese (GNOME)
If you're running Ubuntu, Fedora, or any GNOME-based distro, Cheese is almost certainly already installed. It's been the default webcam app on GNOME for over a decade.
Open Cheese from your application launcher. You'll see a live preview with a big photo button at the bottom. Click it to capture, and your image gets saved to Pictures/Webcam by default.
Cheese also handles video recording and burst mode if you want a few quick shots to pick from. For a simple still photo, though, the workflow is identical to the other platforms: open, frame, click, find the file in your Pictures folder.
If Cheese isn't installed, install it through your package manager with sudo apt install cheese on Debian-based systems or sudo dnf install cheese on Fedora.
Taking a Snapshot with VLC as a Backup Method
If your distro doesn't ship Cheese or you want a tool that's already installed, VLC handles webcam snapshots. Open VLC, go to Media > Open Capture Device, and set the capture mode to "Video camera." Pick your webcam from the device list.
Click Play, and you'll see your webcam feed inside VLC. To take a photo, go to Video > Take Snapshot. VLC saves the image to your Pictures folder by default and shows a small preview thumbnail on screen so you know it worked.
This path is slower than Cheese, but it works on any Linux desktop with VLC, which is most of them. The trade-off is that VLC's snapshot tool doesn't expose resolution settings, so you get whatever the webcam's default capture mode produces.
Step-by-Step Workflow: From Framing to Saved File
Once you've picked your OS and app, the actual capture follows the same rhythm. Here's the workflow distilled into the parts that actually matter.
Framing, Lighting, and Focus
Position yourself so a light source (window, lamp, ring light) hits your face from the front or at a slight angle. Side lighting creates harsh shadows. Backlighting turns you into a silhouette, which is the number one mistake in webcam photos according to aggregate user feedback.
Center yourself in the frame. Leave a little headroom above your head and avoid cutting off your chin. Most webcam apps default to a 16:9 aspect ratio, so frame for landscape unless your app supports a square or portrait crop.
Hold still for a beat after clicking the shutter. Built-in webcams often have a one-frame delay before capture, and movement during that window causes motion blur at 720p.
Capturing the Shot
Click the shutter button once. Don't double-click, that triggers two captures and you'll end up choosing between them. If your app has a timer mode (Photo Booth and Cheese both do), use it for a 3-second delay so your hand isn't in frame.
For higher-end external webcams with autofocus, hold still for a second before clicking so the lens has time to lock on. Autofocus hunting is a common complaint in 1080p and 4K webcam reviews, and a half-second of stillness solves most of it.
Finding the Saved Photo on Your Computer
| Operating System | Default Save Location |
|---|---|
| Windows (Camera app) | Pictures > Camera Roll |
| macOS (Photo Booth) | Export to chosen folder, often Desktop or Pictures |
| macOS (Image Capture) | User-selected folder at capture time |
| Linux (Cheese) | Pictures/Webcam |
| Linux (VLC snapshot) | Pictures (configurable in Preferences) |
If you can't find your file, open the app and check its settings or preferences for the save path. Windows Camera in particular has tripped people up in 2026: if you've signed in with a Microsoft account and OneDrive is set to sync Pictures, the actual file may live in OneDrive's camera roll folder rather than your local drive.
Common Webcam Problems and How to Fix Them
Most webcam photo failures fall into four buckets. Run through these in order before assuming your hardware is broken.
Webcam Not Detected or Showing a Black Screen
If your webcam doesn't show up at all, the most common cause in our research is a permissions block. We've covered Windows and macOS permission toggles above. On Linux, check that your user account is in the video group.
A black screen with the device recognized usually means another app has exclusive access. Close Zoom, Teams, Discord, Skype, or any browser tabs using the camera, then reopen your capture app.
If none of that works, restart your computer. Webcam drivers occasionally hang after sleep mode, and a full reboot clears the lock.
Camera Blocked by App Permissions
This is the silent killer. Operating systems now treat the camera as a protected resource, and every app needs explicit permission. We covered the toggle locations for Windows and macOS above.
If your permission setting is on but the camera still won't start, check whether your organization manages the device. Managed work laptops often have camera access locked down through IT policy, and individual users can't override it.
Another App Already Using the Webcam
Webcams are single-access devices. Only one app can hold the camera feed at a time. If you have a video call running in the background and try to open the Camera app, you'll see an error like "Camera is in use by another application."
Close every app that might be touching the camera: Zoom, Teams, Google Meet in a browser tab, Discord, OBS, Photo Booth. Then try again. On Windows, you can also check Settings > Privacy > Camera to see which apps recently accessed the camera.
Blurry or Low-Resolution Photos
Webcam photos look soft for a few reasons. The lens is small, the sensor is small, and there's no optical image stabilization. None of that changes.
What you can fix: clean the lens with a microfiber cloth. Aggregate reviews of laptop webcam complaints consistently mention smudged lenses as a top cause of hazy photos. Phone screens and laptop screens share oil and grime, and the camera right next to the screen picks up both.
If the image is still soft after cleaning, check whether your app is capturing at a lower resolution. Photo Booth on older macOS versions capped at lower sizes. Switching to Image Capture usually bumps it back up to the sensor's native output.
Best Software Options for Webcam Photos
The built-in apps cover 90% of use cases, but a few third-party tools earn their keep in specific situations.
Built-In Tools vs. Dedicated Apps (ManyCam, Logitech Capture, OBS)
| Software | Best For | Cost |
|---|---|---|
| Windows Camera / Photo Booth / Cheese | Quick single shots | Free, preinstalled |
| ManyCam | Effects, virtual backgrounds, multi-camera | Free tier, paid plans |
| Logitech Capture | Fine control over Logitech webcams | Free |
| OBS Studio | Professional capture, streaming workflows | Free, open source |
Most users never need anything beyond the OS app. If your goal is a single still photo for a profile or document, the built-in tools capture the same pixels the third-party apps would.
When Third-Party Software Actually Helps
Three scenarios justify installing extra software. First, if your built-in app doesn't support burst mode and you want multiple shots to choose from, ManyCam or Logitech Capture fills that gap. Second, if you need to overlay text or graphics on the photo, OBS Studio lets you compose the shot with layered elements.
Third, if you're shooting through an external webcam and want manual control over exposure or white balance, dedicated tools expose settings the OS apps hide.
For everything else, skip the install. The OS app is faster, lighter, and already there.
Webcam vs. Smartphone Camera: When to Use Which
Your phone camera is almost always sharper than your laptop webcam, period. A modern smartphone front camera captures at 12 megapixels or more, with a sensor several times larger than what fits inside a laptop bezel. In raw image quality, the phone wins.
But the webcam still wins on two specific things: convenience and integration. The webcam is already pointed at you while you work, already wired into your computer, and already trusted by your apps. If you're capturing a profile picture while logged into LinkedIn in your browser, grabbing it from the webcam removes the step of transferring a photo from your phone.
Reach for the webcam when the photo is casual, when you're capturing it as part of a workflow already on your computer, or when the file needs to land directly in a specific folder. Reach for the phone when image quality matters more than convenience, when you need a specific angle your webcam can't achieve, or when lighting in your workspace is poor and you'd rather step into better light.
Mistakes to Avoid When Taking Webcam Photos
A few small habits make the difference between a usable shot and a throwaway.
Don't sit with a window behind you. The webcam exposes for the bright background and your face turns into a dark shape. Face the window instead, or close the curtain and use a desk lamp.
Don't use digital zoom. Webcams don't have optical zoom, and software zoom just crops and stretches pixels. Move your chair closer instead.
Don't shoot in a cluttered room. The wide field of view on most webcams picks up everything behind you, including messy desks, unmade beds, and other people who didn't sign up to be in your photo. Plain walls work best.
Don't forget to check your background after capture. Most webcam apps preview the photo for a second before saving. Use that window to retake if something moved into frame.
Don't skip the test shot. Take one photo, open it full screen, and judge it before committing. Webcam photos look smaller on the capture screen than they do when uploaded, and flaws only show up at full size.
Webcam Photo Specs and What to Expect
Knowing what your camera can actually deliver sets realistic expectations before you start.
Typical Resolutions, File Formats, and Sizes
| Webcam Type | Typical Photo Resolution | File Format | Approx. File Size |
|---|---|---|---|
| Laptop built-in (720p) | 1280×720 | JPG | 150-300 KB |
| Laptop built-in (1080p) | 1920×1080 | JPG | 300-600 KB |
| External 1080p webcam | 1920×1080 | JPG or PNG | 400-800 KB |
| External 4K webcam | 3840×2160 | JPG or PNG | 1.5-3 MB |
Most webcam apps save as JPG because the file is smaller and good enough for screen viewing. If you need a lossless capture for editing, Photo Booth and Image Capture on macOS both support PNG export. On Windows, the Camera app saves JPG exclusively as of 2026, so switch to a third-party tool if you need PNG.
File size matters less than it used to. A 300 KB JPG at 1080p is small by 2026 standards and uploads anywhere in seconds. The spec to watch is resolution, because that's what determines sharpness once the photo gets cropped or displayed at full size on a profile page.
Frequently Asked Questions
Where does Windows save webcam photos?
By default, Windows Camera saves photos to This PC > Pictures > Camera Roll. If you use OneDrive to back up your Pictures folder, the file may sync to OneDrive instead of staying local. You can change the save location inside the Camera app's settings menu.
Why is my webcam showing a black screen?
A black screen almost always means another app is using the camera, or your camera permissions are turned off. Close Zoom, Teams, Discord, and any browser tabs using the camera. Then check Settings > Privacy > Camera on Windows, or System Settings > Privacy & Security > Camera on macOS.
Can I take a high-resolution photo with my webcam?
Yes, if your webcam supports it. Use Image Capture on macOS for full-resolution captures, or a third-party tool like Logitech Capture for external webcams that support higher modes. The Windows Camera app saves at the sensor's native resolution automatically.
How do I switch between my built-in webcam and an external USB webcam?
In Windows Camera, click the camera-switch icon in the top right corner. In Photo Booth or Image Capture on macOS, go to the camera selection menu and pick the device you want. Most third-party apps show the active camera name in their settings panel.
Do I need an external webcam for better photo quality?
Not necessarily. If your laptop has a 1080p built-in camera and you shoot in good light, the photo is fine for most online uses. An external webcam helps in low light, offers a larger sensor, and lets you adjust the angle independently of your screen.
Final Recommendation: The Fastest Way to a Great Webcam Photo
If you want the shortest path from "I need a photo" to "I have a file I can upload," here's the play. Use your operating system's built-in camera app, not a third-party tool. Sit facing the light source, not with it behind you.
Clean the lens with a microfiber cloth if the image looks hazy. Take a test shot, judge it full screen, and retake if anything's off. Save the file, and you're done.
The whole process takes about two minutes once you've done it once. The webcam isn't going to replace a DSLR for portrait work, but for profile pics, ID photos, and quick social uploads, it's more than enough. Stick with the OS app, fix the lighting, and you'll get a clean shot every time.