If your Mac webcam isn't working, the fix usually takes under five minutes. Most "no camera detected" errors come from a single macOS privacy toggle, not broken hardware.
Here's the real story. Apple's built-in FaceTime HD camera on most MacBooks ships as a 720p sensor, while newer M-series MacBooks (M2 and later, per Apple spec sheets) bump that to 1080p. As of 2026, macOS Sequoia and the latest macOS builds still hide camera access behind a per-app permission switch.
Flip that switch, pick the right camera inside your app, and you're done. If it still fails, the next stop is Continuity Camera or an external webcam.
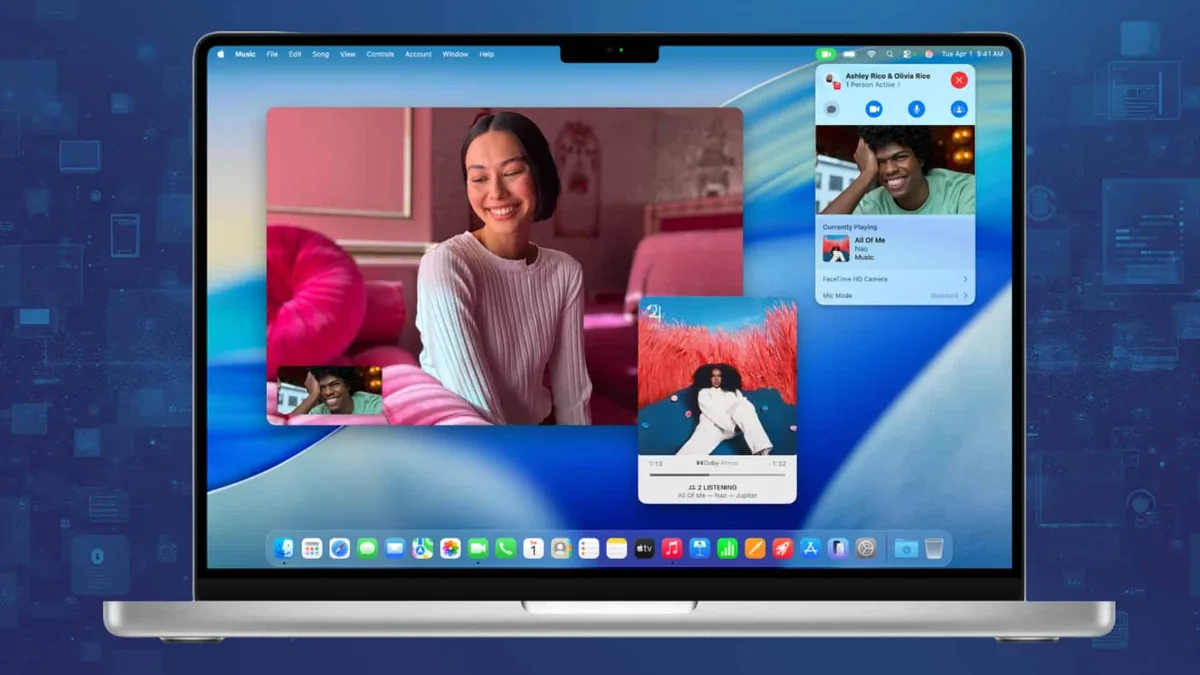
Quick Answer
Open the app you want to use (FaceTime, Zoom, Teams, Meet). Grant camera permission in System Settings > Privacy & Security > Camera. Pick your camera from the app's video settings.
Test it in Photo Booth or QuickTime if it doesn't show up.
Why Your Mac Webcam Isn't Working (The Real Problem)
Nine times out of ten, the camera is fine. macOS is blocking it.
Every Mac since Catalina runs camera access through a privacy gate. Each app has to ask permission the first time it tries to use the camera. If you clicked "Deny" once, or the prompt never appeared (common on older macOS builds), that app never gets camera access again until you flip it on manually.
Here's the pattern we see over and over:
- The green light never comes on when you join a call.
- The app says "No camera found" or shows a black square.
- FaceTime works but Zoom doesn't, or vice versa.
- You updated macOS and now nothing works.
All four point to permissions, not hardware. Apple documents this gate inside System Settings, and it's the single biggest reason a working camera appears "broken."
Other usual suspects:
- Another app is already using the camera. macOS only lets one app hold the camera at a time.
- An external webcam is plugged in but unpowered or on a USB hub the Mac doesn't trust.
- Your Mac is signed into a Managed Apple ID with restrictions (common on work laptops).
- Continuity Camera is paired to an iPhone that's asleep or out of range.
If your green indicator light comes on but the picture is black, jump straight to the troubleshooting section. If the light never comes on at all, start with permissions.
Mac Camera Basics: What You're Actually Working With
Let's clear up what "the webcam" actually means on a Mac, because Apple uses a few different names.
The built-in webcam is called the FaceTime HD camera (older Macs called it iSight). It's the small lens above your screen. On most MacBook Air and older MacBook Pro models, it captures 720p.
On M2 MacBook Air and M3/M4 MacBook Pro models, it's a 1080p sensor. The iMac, Mac mini, and Mac Studio don't have a built-in camera. They need an external webcam or Apple's Continuity Camera feature.
Three ways to get a camera on a Mac in 2026:
- Built-in FaceTime HD camera (MacBooks only)
- Continuity Camera, which turns a paired iPhone into a wireless webcam
- External USB webcam, plugged into a USB-A or USB-C port
Each one shows up separately in your apps. Most apps let you pick from a dropdown menu labeled "Camera," "Video," or "Device." If you've never touched that menu, you're probably defaulting to the built-in camera even when a better one is plugged in.
Quick spec snapshot:
| Camera Type | Typical Resolution | macOS Requirement | Best For |
|---|---|---|---|
| Built-in (MacBook) | 720p or 1080p | Any modern macOS | Casual calls, meetings |
| Continuity Camera | Up to 4K (iPhone-dependent) | macOS Ventura + iOS 16+ | Upgrading any Mac's video quality |
| External USB webcam | 1080p or 4K | macOS 10.14+ | Studios, streaming, Mac mini setups |
Knowing which one you're actually using is the first step. Most "my webcam is bad" complaints come from someone on a 720p built-in camera when they had a perfectly good external webcam plugged in the whole time.
Decision Check: Which Mac Setup Are You On?
The exact steps shift a little depending on your Mac and what you want to do. Run through this quick decision tree before you start clicking.
Are you on a MacBook (Air or Pro)?
Yes, the built-in camera is your default. Skip the external webcam section unless you want better quality.
No, jump to "Connecting an external webcam."
Do you have an iPhone running iOS 16 or later?
Yes, Continuity Camera is available and gives you the best picture quality without buying anything.
No, you'll need an external webcam for better-than-720p video on a Mac mini, iMac, or Mac Studio.
What app are you trying to use?
- FaceTime or Photo Booth: built-in support, no extra setup.
- Zoom, Teams, Meet, Slack: needs permission granted in System Settings first.
- Browser-based tools (Google Meet in Chrome, web WhatsApp): needs permission granted to the browser.
- OBS, QuickTime, or third-party recording apps: same permission flow, plus you usually have to pick the camera inside the app.
Which macOS are you on?
- macOS Ventura or later (13+): System Settings > Privacy & Security > Camera.
- macOS Monterey or earlier (12 and below): System Preferences > Security & Privacy > Privacy > Camera.
If you're on Big Sur or older, the screenshots will look slightly different, but the flow is identical. Apple keeps the camera permission menu in the same place across versions.
Built-In Webcam vs. Continuity Camera vs. External Webcam
This is the real choice most people skip. They grab whatever's already there and assume it can't be improved. It can.
| Feature | Built-In Webcam | Continuity Camera | External USB Webcam |
|---|---|---|---|
| Resolution | 720p or 1080p | Up to 4K (iPhone XR+) | 1080p or 4K |
| Setup time | Zero | 2 minutes | 1 minute |
| Cost | Included | Free (needs iPhone) | $40 to $200 |
| Auto-framing / Desk View | No | Yes (Studio Light, Desk View on iOS 17+) | Varies by model |
| Works when Mac is closed (clamshell mode) | No | Yes (iPhone is the camera) | Yes |
| Privacy indicator light | Hardware green LED | Uses iPhone's indicator | Hardware LED on most models |
| Best for | Travel, quick calls | Anyone who owns a recent iPhone | Studios, Mac mini, streaming |
A few practical notes from what we hear consistently in user feedback:
- Continuity Camera on iPhone 14 and later delivers noticeably better video than the built-in MacBook camera, even on a 1080p MacBook.
- External webcams like the Logitech C920 or Elgato Facecam are still the gold standard for streaming because they support manual focus, exposure, and clean mounts.
- Built-in cameras can't see you when the MacBook lid is closed in clamshell mode. Continuity Camera and most external webcams can.
- The green privacy light is hardware-tied on built-in cameras. You cannot turn it off without third-party hacks. That's a feature, not a bug.
If you want the best balance of cost and quality in 2026 and you already own an iPhone XR or newer, Continuity Camera wins. If you don't own a recent iPhone and you sit at a desk all day, an external webcam is the upgrade with the longest lifespan.
Heads up. Apple has not published a complete public API for Continuity Camera's Studio Light and Desk View features, and support varies by iPhone model. If a feature doesn't show up, check your iOS version and iPhone model against Apple's Continuity Camera system requirements page.
Step-by-Step: Enable Camera Access in macOS Settings
This is the fix that solves most webcam problems. Apple's permission system is strict, and once an app is denied, it stays denied until you manually re-enable it.
macOS Ventura and Later
- Click the Apple menu, then System Settings.
- Click Privacy & Security in the sidebar.
- Scroll down and click Camera.
- Toggle on every app you want to allow.
You'll see a list of every app that has requested camera access. Green toggles mean allowed. If Zoom, Chrome, or Teams are missing from the list entirely, that app has never asked.
Open the app and try to use the camera. macOS will pop the permission prompt.
macOS Monterey and Earlier
- Open System Preferences.
- Click Security & Privacy.
- Click the Privacy tab.
- Select Camera from the left sidebar.
- Check the boxes next to the apps you want to allow.
You may need to click the lock icon at the bottom and enter your password before changes save.
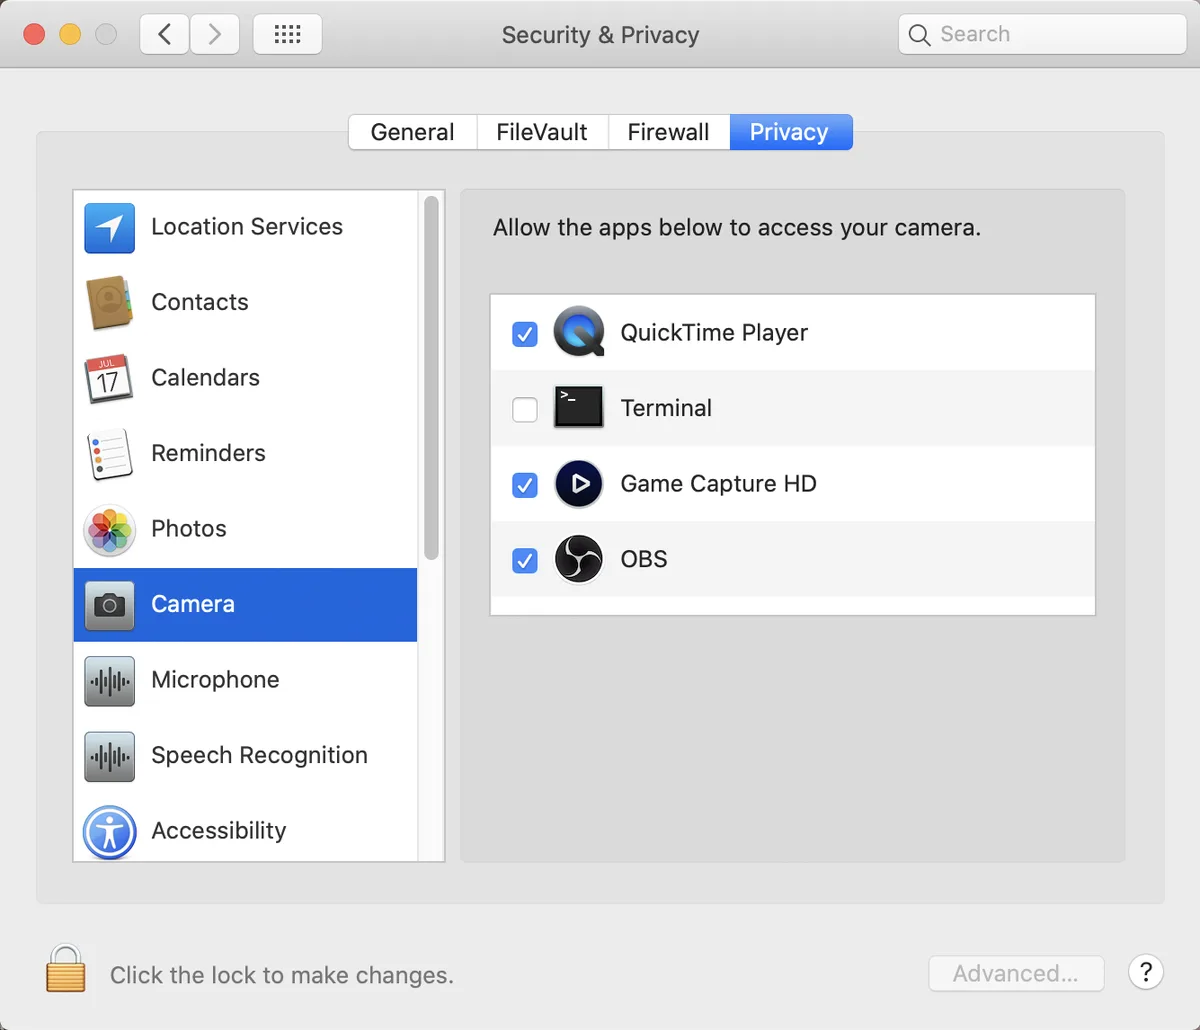
After You Change Permissions
Always restart the app you just enabled. macOS doesn't apply new camera permissions to a running process. Closing and reopening Zoom, Chrome, or Teams is required. A full Mac restart isn't usually necessary, but it doesn't hurt.
Step-by-Step: Use Your Webcam in Common Apps
Permissions are global, but each app has its own camera picker. Here's where to find it in the apps people use most.
FaceTime
FaceTime auto-selects the built-in camera. To switch:
- Open FaceTime.
- Pull down the Video menu in the menu bar.
- Choose Camera, then pick your device.
FaceTime works with built-in, Continuity, and most USB webcams. No extra setup beyond the macOS permission toggle.
Zoom
- Open Zoom, click your profile picture, then Settings.
- Click the Video tab.
- Use the Camera dropdown to choose your device.
- Check the mirror effect box if you want the familiar "selfie" view.
Zoom remembers your choice between sessions. If your camera disappears after a macOS update, sign out of Zoom and back in to force a fresh device scan.
Microsoft Teams
- Click the three-dot menu next to your profile, then Settings.
- Click Devices.
- Under Camera, pick your webcam from the dropdown.
Teams sometimes keeps the old camera selected after a reboot. If your picture doesn't show, restart Teams completely. Quit from the menu bar, not just the window close button.
Google Meet (in Chrome)
- Open meet.google.com and join or start a call.
- Click the three-dot menu before joining, or click the More options button in the call.
- Pick Settings.
- Under Video, choose your camera.
Chrome asks for camera permission separately from macOS. If Chrome can't see your webcam, click the camera icon in the address bar and change the dropdown from "Block" to "Allow."
QuickTime Player (for Recording)
- Open QuickTime Player.
- Click File, then New Movie Recording.
- Click the arrow next to the record button.
- Pick your camera and microphone.
QuickTime is the fastest way to test whether your Mac sees a webcam at all. If QuickTime shows a preview, the camera is working. If it doesn't, jump to the troubleshooting section.
Step-by-Step: Use Your iPhone as a Mac Webcam (Continuity Camera)
If you own a recent iPhone, this is the single biggest video quality upgrade you can make without buying anything. Continuity Camera is built into macOS Ventura and later. It pairs your iPhone wirelessly and uses it as a high-quality webcam.
What You Need
- A Mac running macOS Ventura (13) or later
- An iPhone running iOS 16 or later
- Both devices signed into the same Apple ID
- Bluetooth and Wi-Fi turned on for both devices
- iPhone XR or newer for full feature support
How to Set It Up
- Mount your iPhone near your Mac. Apple's MagSafe mount or any standard phone mount works.
- Bring the iPhone close to your Mac. A Continuity Camera popup should appear on the iPhone asking if you want to connect.
- Tap Accept on the iPhone.
- Open FaceTime, Zoom, or any video app on your Mac.
- Pick your iPhone from the camera dropdown.
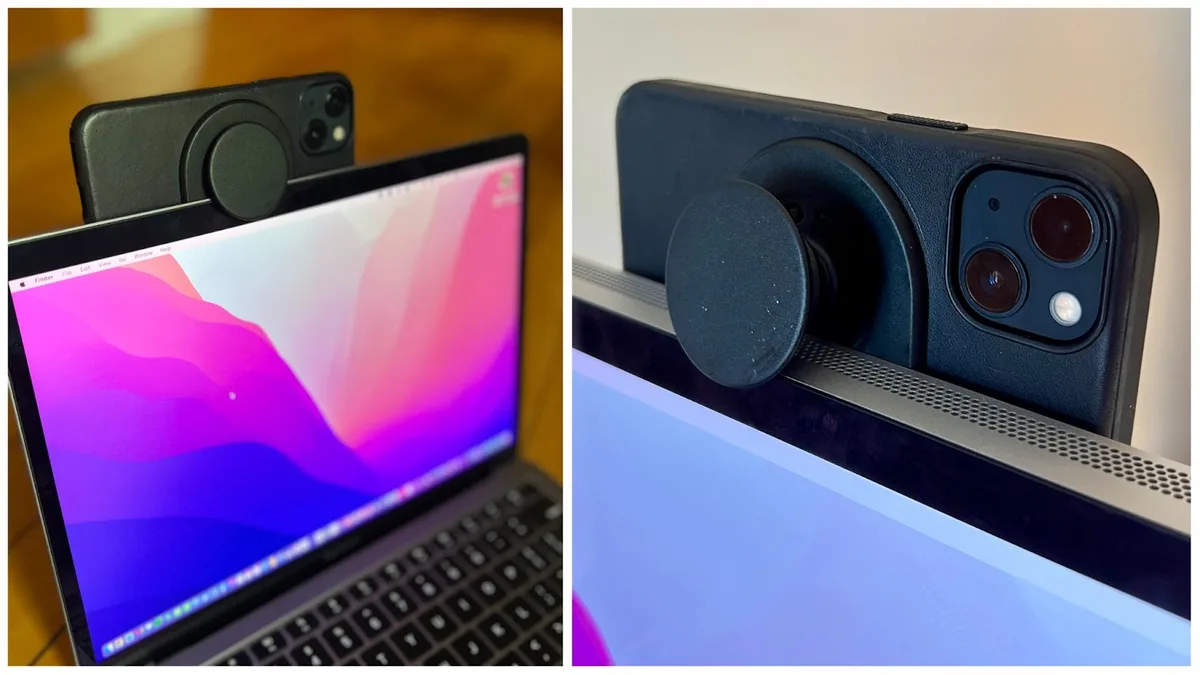
Cooler Features Worth Turning On
- Desk View: Shows a top-down view of your desk. Great for showing paper notes or sketch work on calls.
- Studio Light: Dims the background and brightens your face, like a ring light built into the iPhone.
- Center Stage: Auto-follows your face as you move around the frame.
These are toggled inside the iPhone's Control Center when Continuity Camera is active. iOS 17 and later add more polish to all three.
Common Continuity Camera Problems
- iPhone won't pair: Make sure both devices use the same Apple ID, and that Bluetooth and Wi-Fi are on. Toggle airplane mode on and off on the iPhone to reset the radios.
- Connection drops mid-call: Your iPhone may be going to sleep. Plug it into power or turn off Auto-Lock while in use.
- No audio from iPhone mic: Some apps default to the Mac's mic. Check the audio settings in your video app and switch the input to "iPhone."
Step-by-Step: Connect and Set Up an External USB Webcam
If you don't have an iPhone or you want studio-grade quality, an external webcam is the move. Most modern USB webcams are plug-and-play on macOS. No driver install needed.
Plug It In
- Plug the webcam into a USB-A or USB-C port. If your Mac only has USB-C, use a hub or a direct USB-C cable.
- Wait 5 to 10 seconds for macOS to detect the device.
- Open FaceTime, Photo Booth, or QuickTime to confirm the camera appears.
macOS treats most UVC-compliant webcams as standard devices. UVC is the universal USB video class. Every webcam from Logitech, Elgato, Razer, and most others ships as UVC.
If a webcam requires a custom driver, that's a red flag for Mac users.
Pick the Camera in Your App
Same flow as the built-in camera. Go to your app's video settings and select the new device from the dropdown. Restart the app if it doesn't show up.
Mounting and Positioning
A few practical notes:
- Mount the webcam at eye level for the most natural angle.
- Avoid placing it directly above your screen. Top-of-screen mounting exaggerates eye-line drop.
- If your webcam has a threaded mount on the bottom, pair it with a small tripod. Stability matters more than resolution.
Common External Webcam Issues
- No signal at all: Try a different USB port, preferably directly on the Mac, not through an unpowered hub.
- Fuzzy or stuttering video: USB bandwidth is shared. Disconnect other USB devices or use a USB 3 port.
- Mic not working: The webcam's mic shows up as a separate input. Pick it manually in System Settings > Sound > Input.
How to Test Your Mac Camera Before a Call
Never join a meeting and hope the camera works. Test it 60 seconds before. Here are the fastest ways.
Method 1: Photo Booth
Open Photo Booth. Your camera preview appears instantly. If you see yourself, the camera works at the system level.
No app-specific permissions needed.
Method 2: QuickTime Player
File > New Movie Recording. QuickTime gives you a clean preview with audio level meters, perfect for confirming both camera and mic.
Method 3: Browser-Based Test
Visit a site like webcamtests.com or mozilla.org/webcam. These run entirely in your browser and confirm camera, mic, and permission flow all at once.
What to Check in 60 Seconds
- Picture shows your face, not a black square.
- Resolution looks sharp at your normal viewing distance.
- Audio levels respond when you speak.
- No flickering or stuttering.
- Lighting doesn't blow out your face or leave you in shadow.
If any of those fail, fix them before the call, not during.
Troubleshooting: Mac Camera Not Detected or Showing Black Screen
When the camera is dead silent, work through these in order. Most users fix it by step three.
- Quit the app completely and reopen it. macOS doesn't apply camera permission changes to live processes.
- Check System Settings > Privacy & Security > Camera. Make sure the app you're using is toggled on.
- Test in Photo Booth or QuickTime. If neither sees the camera, the problem is system-level. If both work, the problem is the app.
- Restart the Mac. Clears stuck camera processes and resets USB handshakes.
- On Intel Macs, reset the System Management Controller. SMC resets fix a long list of hardware-handshake bugs on older machines.
If the green light is on but the screen is black, the camera may be physically blocked. Check for a stuck shutter slider above the lens, common on older MacBooks. A piece of tape or sticker over the lens will do the same thing.
If nothing works after all five steps, the hardware itself may be failing. Apple Stores and Apple Authorized Service Providers can diagnose built-in camera faults in under an hour.
Fixing Camera Permission Issues (The #1 Reason It Fails)
Permissions are sneaky because the failure looks identical to a hardware fault. No camera detected. No error message.
Just a black square or an empty dropdown.
The fastest diagnostic: open Terminal and run log show --predicate 'subsystem == "com.apple.camera"' --last 1m. This shows live camera access logs. If you see denied events for the app you're testing, permissions are the cause.
To fix:
- Open System Settings > Privacy & Security > Camera.
- Toggle the offending app off, then back on.
- Quit the app fully, reopen it, and test.
If the app isn't in the list at all, it has never asked for camera access. Open the app and trigger a video action. macOS will surface the permission prompt.
Work-managed Macs (managed Apple IDs, MDM profiles) can have camera access locked at the OS level. If you can't toggle anything in Privacy settings, talk to your IT admin. There's no user-side override.
Mistakes to Avoid When Using Your Mac Webcam
A few habits that cause more problems than they solve.
- Denying permissions by accident. The first permission prompt only shows once. If you click "Don't Allow," the app has no recourse. Re-enable it manually.
- Leaving the camera on after calls. Battery drain on MacBooks, heat buildup, and the green light being a privacy signal. Quit the app.
- Covering the camera with tape without testing. If you cover it, your next call fails silently. Build the habit of quitting apps instead.
- Using unpowered USB hubs. A webcam that intermittently disappears is almost always a power issue. Plug into the Mac directly or use a powered hub.
- Forgetting to select the right camera in the app. Built-in, Continuity, and external webcams all show up. If you've added one recently, the app may still be defaulting to the old one.
Pro Tips for Better Video Quality on Mac
Hardware matters, but lighting beats hardware every time.
- Face a window. Natural front light is the single biggest upgrade. Side or back lighting leaves you in shadow.
- Raise the camera to eye level. Stack of books, laptop stand, whatever works.
- Use a neutral or slightly warm background. Busy walls pull attention from your face.
- Clean the lens. MacBook cameras collect dust and oil. A microfiber cloth once a week is plenty.
- Turn on Continuity Camera's Studio Light if you have a recent iPhone. It really does work.
- Disable auto-exposure if your webcam allows it. The camera will stop chasing every window glare.
- Use a dedicated mic for anything longer than a 10-minute call. The built-in MacBook mic picks up fan noise.
Final Decision Guide: Which Webcam Setup Should You Use?
Here's the quick picker:
- MacBook user, casual calls: Built-in camera. It's fine. Enable permissions and move on.
- MacBook user, frequent calls or work meetings: Continuity Camera with iPhone. Best quality-to-cost upgrade available.
- Mac mini, Mac Studio, or iMac user: External webcam. Get a 1080p UVC model from a known brand.
- Streamer or content creator: External webcam plus a dedicated mic. Built-in cameras aren't built for this.
- On the go, no time to set up: Built-in. Just enable permissions before you leave.
For most people reading this in 2026, the answer is Continuity Camera. It's free, it's already in your pocket, and it makes any Mac look like it has a $150 webcam bolted on.
Frequently Asked Questions
Why is my Mac camera not working even though the green light is on?
The light is hardware-tied to power, not to a working video signal. The camera may be physically blocked, the app may not have permission, or the app may be frozen. Test in Photo Booth to isolate the issue.
How do I turn on the camera on a Mac for the first time?
You don't turn it on. macOS enables the camera automatically when an app requests access. Your job is to grant that permission in System Settings > Privacy & Security > Camera, then select the camera inside the app.
Can I use my iPhone as a webcam on any Mac?
Yes, if the Mac runs macOS Ventura or later. The iPhone needs iOS 16 or later and an iPhone XR or newer for full feature support. Both devices must be on the same Apple ID.
What's the best webcam for a Mac mini?
Any UVC-compliant 1080p or 4K webcam works. Logitech C920, C922, and Brio are the most common picks. Elgato Facecam is popular with streamers.
Match the webcam to your use case. General calls, streaming, or content creation all favor different specs.
How do I reset my Mac camera if nothing else works?
Quit all apps using the camera, then restart the Mac. On Intel Macs, an SMC reset clears stubborn hardware bugs. On Apple silicon, a full shutdown and reboot does the same job.
If the camera still doesn't show in Photo Booth after both, the hardware may need service.
Does using the Mac webcam drain battery?
Yes, but not much. The sensor is low-power. Video encoding and screen brightness drain far more.
If battery life matters, dim the screen and close other apps during long calls.