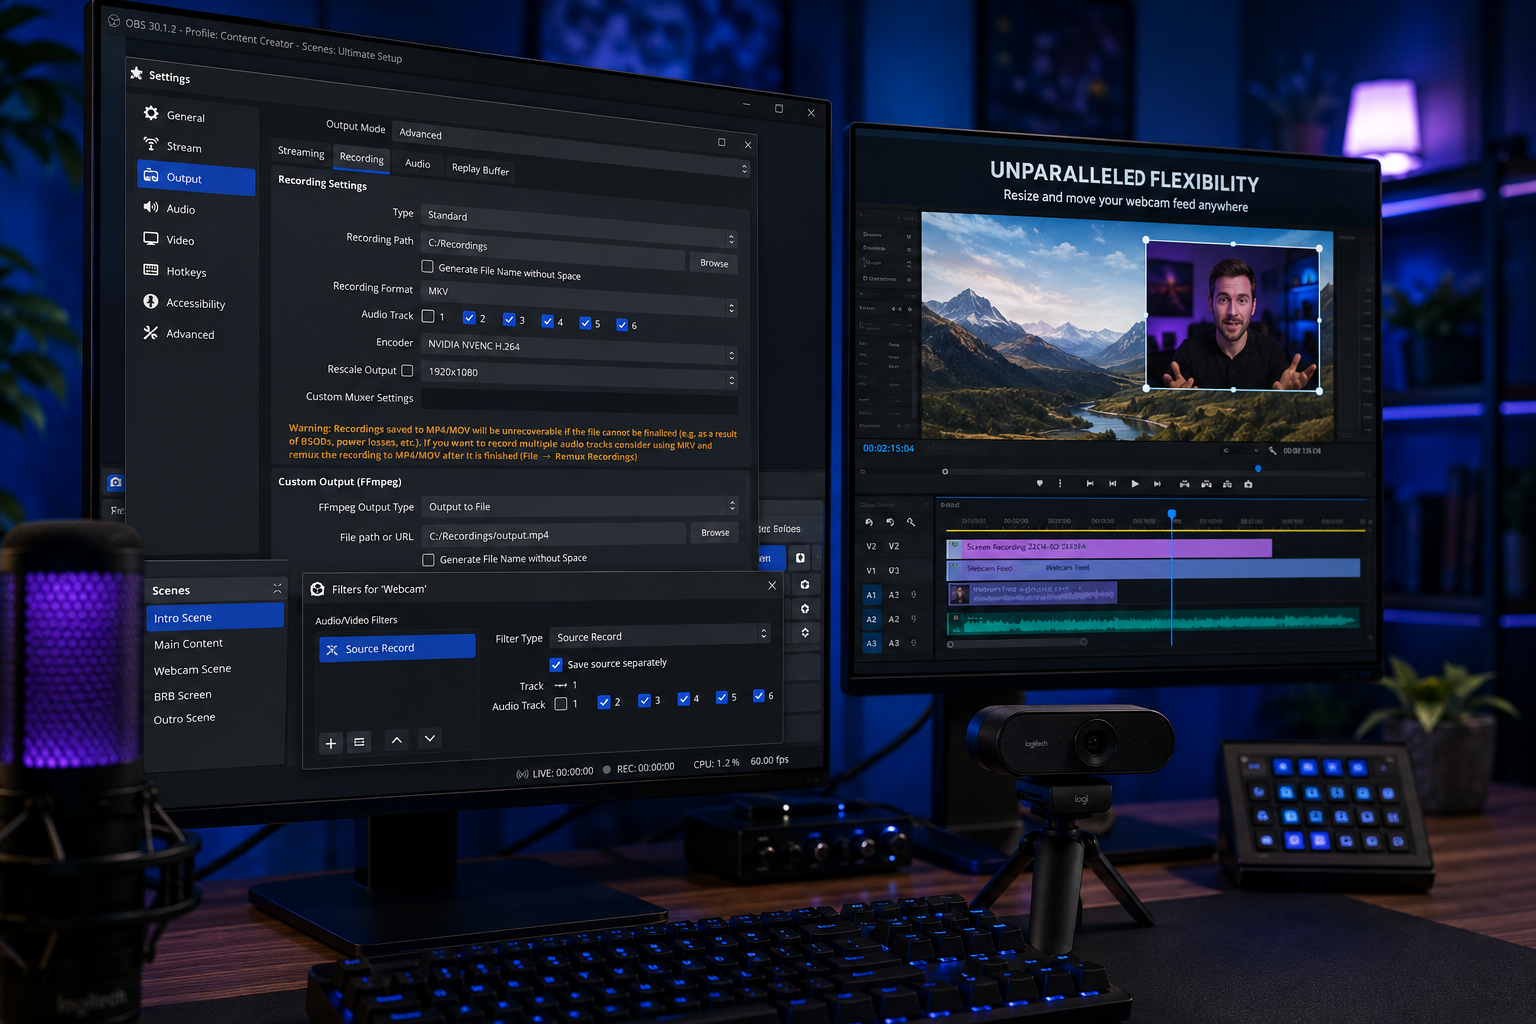
Recording your webcam and screen separately in OBS Studio offers unparalleled flexibility for content creators, allowing you to manipulate each element independently during post-production. While OBS is a powerful tool, achieving true separation for both video and audio requires a specific setup. This detailed guide will walk you through the process, ensuring your webcam and screen footage, along with their respective audio, are recorded as distinct, editable assets.
Imagine having complete control over your video elements. With separate recordings, you can easily resize, reposition, or remove your webcam feed without affecting your screen recording. This level of control is crucial for creating professional-grade tutorials, engaging gameplay videos, or polished presentations. Let’s dive into the practical steps to unlock this capability in OBS Studio.
Why Separate Recordings Are a Game Changer for Content Creators
Recording your webcam and screen as independent files transforms your post-production workflow. It provides a level of control that single, merged recordings simply cannot offer.
Unlocking Editing Flexibility
When you record your webcam and screen separately, you gain immense flexibility in your video editor. You can adjust the size, position, and even the existence of your webcam footage at any point in the timeline. This is invaluable for:
- Tutorials: Temporarily hide your facecam if it covers important on-screen information.
- Gaming: Experiment with different webcam placements without re-recording the entire game session.
- Presentations: Easily switch between a full-screen presentation and a picture-in-picture view of yourself.
Achieving Superior Quality Control
Separate recordings enable you to optimize the quality of each element individually. You can apply specific color corrections, sharpen details, or add visual effects to your webcam feed without impacting your screen capture, and vice versa. This also helps with backups; if one file corrupts, you still have the other.
Streamlining Post-Production
Video editing is significantly streamlined when your sources are distinct. You can quickly synchronize audio and video tracks, make precise cuts, and easily repurpose segments. As freelance video editor Julian Langham notes, “Many factors can affect how much time the post-production process can take for any particular programme, film, trailer or video.” Separate elements reduce complexity, making the editing process more efficient.
OBS Studio Fundamentals: Your Control Center
Before diving into separate recordings, it’s essential to understand some core OBS Studio concepts. If you’re new to OBS, this brief overview will help you navigate the interface.
- Scenes: A scene is a collection of sources. Think of it as a canvas where you arrange your video and audio inputs.
- Sources: These are the individual elements you want to capture, such as your display, webcam, microphone, or game audio.
- Audio Mixer: This panel allows you to monitor and adjust the volume levels for all your active audio sources.
- Output Settings: Here, you configure how OBS processes and saves your recordings, including file format, quality, and audio tracks.
Method 1: Recording Separate Audio Tracks in OBS
Separating your audio is arguably the most straightforward aspect of recording independently in OBS. This ensures your voice and desktop audio are on different tracks within a single video file, allowing for granular control in editing.
Step 1: Configure Output for Multiple Audio Tracks
First, you need to tell OBS to record multiple audio tracks. Not all recording formats support this, so using MKV is highly recommended. You can remux MKV files to MP4 later if needed.
- Open OBS Studio and go to Settings (File > Settings or the gear icon in the Controls dock).
- Navigate to the Output tab.
- Change the Output Mode to Advanced.
- Click on the Recording tab.
- Under the “Audio Track” section, check boxes for at least two tracks (e.g., Track 1 and Track 2). You can enable up to six.
- Set your Recording Format to MKV. This format is more resilient to crashes than MP4, preserving your recording up to the point of interruption.
- Choose your Recording Path where your files will be saved.
Step 2: Assign Audio Sources to Specific Tracks
Now, you’ll assign each audio source (your microphone, desktop audio) to its own track. This is done through the Advanced Audio Properties.
- In the main OBS window, locate the Audio Mixer dock.
- Click on the gear icon next to any audio source to open the Advanced Audio Properties.
- You will see a list of all your active audio sources and columns for each audio track you enabled (Track 1, Track 2, etc.).
- For your Microphone/Aux audio source, check only one track (e.g., Track 1). Uncheck it from all other tracks.
- For your Desktop Audio source, check only a different track (e.g., Track 2). Uncheck it from all other tracks.
- You can assign a third track for other audio, like Discord, if desired. Track 1 is often used as a “mix-down” track for streaming, while separate tracks are for editing.
- Close the Advanced Audio Properties window.
Now, when you record, your webcam’s microphone audio and your computer’s desktop audio will be saved onto separate tracks within the same MKV video file. Most video editing software can easily import and separate these audio tracks.
Method 2: Recording Separate Video Files for Webcam and Screen with the Source Record Plugin
OBS Studio does not natively record multiple video sources into separate files within a single recording session. However, the OBS Source Record plugin provides this crucial functionality. It acts like a “mini-OBS” within OBS, allowing you to record individual sources independently.
This method is highly recommended for achieving true separate video files, giving you maximum control in post-production.
Step 1: Download and Install the Source Record Plugin
Before proceeding, ensure OBS Studio is closed.
- Go to the official OBS Project forums or the plugin’s GitHub page to download the Source Record plugin. Make sure to download the version compatible with your operating system (Windows, Mac, or Linux).
- Run the installer if one is provided. Otherwise, manually copy the plugin files into the correct OBS Studio folder (e.g.,
C:\Program Files\obs-studioon Windows). - Restart OBS Studio after installation. The plugin will now be available as an effect filter for your sources.
Step 2: Set Up Source Record for Your Webcam
You will apply the Source Record filter to your webcam source to record it as an individual video file.
- In OBS Studio, locate your webcam source (e.g., “Video Capture Device”) in your current scene.
- Right-click on the webcam source and select Filters.
- In the Filters dialog box, click the + icon under “Effect Filters” and select Source Record from the list. Click OK.
- In the Source Record properties, configure the following:
- Record Mode: Choose when the source should start recording. Options include “Always,” “Streaming,” “Recording,” or “Streaming or Recording.” Selecting “Recording” means it will start when you hit the main OBS record button.
- Path: Specify a unique folder for your webcam recordings.
- File Name Formatting: Add a differentiator like “_Webcam” to avoid overwriting your main recording and clearly identify the file (e.g., “%Y-%m-%d %H-%M-%S_Webcam”).
- Recording Format: Choose a suitable format. While MKV is safe, MP4 is often preferred for direct editing. Some sources also mention “Hybrid MP4” for added resilience.
- Different Audio: Check this option. Select the audio track you assigned to your microphone in Method 1 (e.g., Track 1). This ensures your webcam’s isolated video file also contains its dedicated audio track.
- Adjust encoder and quality settings as needed. Lowering these might be necessary if your system struggles.
- Close the Filters window.
Step 3: Set Up Source Record for Your Screen Capture
Repeat the process for your screen capture source (e.g., “Display Capture” or “Game Capture”).
- Locate your screen capture source in your scene.
- Right-click on it and select Filters.
- Add another Source Record filter.
- Configure its properties, ensuring:
- Record Mode: Match it to your webcam’s setting (e.g., “Recording”).
- Path: Use a separate folder or the same as the webcam, but with distinct file naming.
- File Name Formatting: Add a differentiator like “_Screen” (e.g., “%Y-%m-%d %H-%M-%S_Screen”).
- Recording Format: Match your webcam’s setting.
- Different Audio: Check this option and select the audio track you assigned to your desktop audio in Method 1 (e.g., Track 2).
- Close the Filters window.
Now, when you press the “Start Recording” button in OBS, you will simultaneously get two separate video files: one for your webcam and one for your screen, each with its dedicated audio track. Your main OBS output will still record the combined scene as usual, but you’ll also have the isolated sources.
It’s crucial to test your setup with a short recording to verify that two separate files are indeed being created in your specified output folders.
Advanced Considerations and Best Practices
Beyond the core setup, a few tips can enhance your separate recording workflow and overall video quality.
Optimal Recording Settings
High-quality separate recordings require thoughtful OBS output settings. These are general recommendations; always test to find what works best for your system.
- Resolution: Match your screen’s native resolution for screen capture. For webcam, use its native resolution (e.g., 1920×1080).
- Frame Rate: 30 FPS is standard for most content, but 60 FPS offers smoother motion, especially for gaming. Be aware that 60 FPS demands more system resources.
- Bitrate: This heavily impacts video quality and file size. For high-quality 1080p recordings, target 6,000-8,000 Kbps for screen capture and 3,000-5,000 Kbps for webcam, depending on complexity. Higher bitrates mean larger files but better detail.
- Encoder: Use your GPU’s encoder (NVIDIA NVENC, AMD AMF, Intel Quick Sync) if available, as it offloads the encoding task from your CPU, reducing performance impact.
Hardware and Environment Setup
Even the best OBS settings can’t fix poor input quality. Invest in good peripherals and optimize your recording space.
- Dedicated Microphone: A good USB or XLR microphone significantly improves audio quality over built-in webcam mics.
- Lighting: Proper lighting makes a huge difference for webcam footage. Aim for soft, even lighting that illuminates your face.
- Clean Background: A tidy or intentionally designed background for your webcam enhances professionalism.
Post-Production Workflow with Separate Files
Once you have your separate video and audio files, your video editing software becomes your playground. Tools like Adobe Premiere Pro, DaVinci Resolve, or Final Cut Pro allow you to import all tracks, synchronize them, and then edit each independently.
With separate video files, you can layer them in your timeline. Your screen recording might be on the bottom track, and your webcam on a track above it. This allows you to freely move, resize, or apply effects to your webcam without affecting the screen. You can also easily cut out segments of your webcam footage, leaving just the screen visible.
The demand for video content continues to surge. In 2026, 91% of businesses are leveraging video for marketing, a figure that’s tied for an all-time high. Furthermore, short-form video content (under 60 seconds) receives 2.5 times more engagement than longer formats, highlighting the need for efficient editing workflows that separate recordings facilitate.
Alternative Approaches to Separate Recording (Less Recommended)
While the Source Record plugin is the most direct solution, some users might consider other, more complex methods. These are generally less efficient or practical for most creators.
Recording Multiple Scenes Sequentially
One basic method involves recording your screen in one session and your webcam in another. You would set up a “Screen Scene” with only your display capture and desktop audio, record it, then switch to a “Webcam Scene” with only your webcam and microphone, and record that. This approach ensures separate files but requires careful synchronization in post-production and is not suitable for content where simultaneous action (like gaming with reactions) is crucial.
Using OBS’s Native Crop and Split Method (for one video file)
Some users create a single, extra-wide OBS canvas where the screen and webcam are placed side-by-side. You then record this single, wide video file. In post-production, you would import this single video twice into your editor and crop each instance to show either the screen or the webcam. This provides separation in editing but is more cumbersome, requires more processing power to record at higher resolutions, and is still a single video file.
Ultimately, the flexibility and precision offered by the Source Record plugin make it the superior choice for truly separate webcam and screen video recordings within a single OBS session.
FAQ
What is the OBS Source Record plugin?
The OBS Source Record plugin is a third-party extension for OBS Studio that allows you to record individual sources (like your webcam or display capture) to separate video files. It functions as a filter you apply to each source, providing independent recording controls.
Can OBS record multiple audio tracks natively?
Yes, OBS Studio can natively record up to six separate audio tracks within a single video file. You configure this in the Output settings under the Recording tab and then assign individual audio sources to specific tracks in the Advanced Audio Properties.
Why would I want to record my webcam and screen separately?
Recording separately provides greater flexibility in post-production editing. You can independently adjust the size, position, timing, and effects of your webcam and screen footage, making your videos more dynamic and professional. It also helps with quality control and backup.
Is the Source Record plugin safe to use?
The Source Record plugin is widely used and available on the official OBS Project forums, which typically hosts vetted plugins. As with any third-party software, it’s always wise to download from official sources and ensure compatibility with your OBS version.
What video format should I use for separate recordings?
For multi-track audio, MKV is recommended as it’s more resilient to crashes and saves your recording up to the point of interruption. For separate video files via Source Record, both MKV and MP4 are options; MP4 is generally easier to work with in most video editors without remuxing.
Conclusion
Recording your webcam and screen separately in OBS Studio is a powerful technique that elevates your content creation. By leveraging OBS’s native multi-track audio capabilities and the essential Source Record plugin for video, you gain complete control over each element in post-production. This meticulous approach ensures maximum editing flexibility, superior quality control, and a streamlined workflow, ultimately allowing you to produce polished, professional videos that captivate your audience. Embrace these methods, and transform your OBS recordings into versatile assets ready for any creative vision.